🚽 Upgrade your throne with Kohler’s sleek, all-in-one conversion kit!
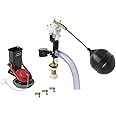
The Kohler 84499 1B1X Conversion Kit is a comprehensive replacement set for older one-piece toilets, featuring brass fill and flush valves, flapper, and gaskets. Compact and easy to install, it ensures reliable performance and durability, backed by Kohler’s trusted one-year warranty.
| Material | Brass |
| Brand | Kohler |
| Item dimensions L x W x H | 14 x 5.75 x 5.75 inches |
| Exterior Finish | painted |
| Inlet Connection Type | Barb |
| Outlet Connection Type | Barb |
| Valve Type | flush valve |
| Manufacturer | Kohler |
| UPC | 040688953830 |
| Part Number | 84499 |
| Item Weight | 1 pounds |
| Product Dimensions | 14 x 5.75 x 5.75 inches |
| Country of Origin | China |
| Item model number | 84499 |
| Is Discontinued By Manufacturer | No |
| Size | One Size |
| Color | No Finish |
| Style | Conversion Kit |
| Finish | No Finish |
| Item Package Quantity | 1 |
| Number Of Pieces | 1 |
| Included Components | Conversion Kit |
| Batteries Included? | No |
| Batteries Required? | No |
| Warranty Description | One-Year Limited Warranty |
G**L
Kohler Replacement Water Valve for Older Kohler One Piece Toilets
This conversion kit was purchased for a Kohler K 3397 San Raphael toilet originally installed in 1992. The conversion kit will also work equally well on other Kohler one piece toilets such as the K 3402 Rialto.Generic water valves such as the Fluidmaster available at most plumbing and hardware stores will not fit in the older Kohler low profile one piece toilets. Fortunately, Kohler offers this conversion kit that enabled the toilet in my home to be saved.My plumber installed the replacement conversion kit one month ago. The installation was easy and straight forward and the valve has been working properly since it was installed.This is an original Kohler Replacement part. There are some reviews indicating that this product might not be an original Kohler replacement part. This does not appear to be the case - at least not from careful observation and inspection of the product and enclosed instructions.If you have an older Kohler one piece toilet and the water does not shut off completely or leaks, then this conversion kit will enable you to keep the toilet for years to come and avoid the cost of replacing an otherwise functional and stylish low profile one piece toilet.
J**E
Perfect
Installed this in an old Rialto with the round tank level tube. Had it for 26 years, and the only problem was a weak flush for the last few months. One day the inlet valve let go and water was continually flowing, so a replacement was needed. After a lot of research and a failed Korky try, I used this kit. Spent most of the time prepping the bottom as the silicon glue was tough to remove. Installing the new flapper valve with the lugs takes patience, so take your time. The instructions said you can use the rim feed tube to keep them oriented, but I did not try it. I installed the inlet valve without the float attached, as it was easier. Make sure you leave room for the float against the back wall if you do it. this way. As one reviewer said, the rim feed tube is a pita. I ended up whittling it down and installing it first, and then attaching it. Be careful here as the attach point on the valve is plastic. I also used a hair dryer to heat it up. It seemed to make a difference, but hard to tell. After install, just some minor adjustments and worked well. I did notice a couple things that were improved. It filled faster, the rim feed was better, and the flush was better. Additionally, I was getting black residue where the rim feed water came out. It turns out that the old flapper valve was disintegrating and would be the next piece to fail.
D**N
This fit my 1991 One-Piece Eljer
As my headline said, "This fit my 1991 One-Piece Eljer low boy." Boy was I relieved and pleased!Although this is an expensive fix, all of the parts are of high quality. I don't regret the price paid.I only used the complete fill valve assembly. I did not use the flush valve or flapper as I didn't need them. They would have been a tight fit in the left end of the tank as everything else was there. As I am familiar with the innards of this toilet, installation only took about 45 minutes. I used the piece of (supplied) 3/4" hose to modify my existing "Rim Flush" hose. I also had to fit the float ball and rod to the valve before installing it in the toilet due to the angles involved.
H**R
Yes, it works, Don't waste money on the other stuff. But, a struggle with some parts.
I have just installed this on a low Rialto Kohler. Having spent too much money on stop gap repair, including other kits that were cheaper, and multiple fixes that didn't work, I bit the bullet.Having installed this one, I know have just purchased anther one for a toilet that leaks and has been through multiple fixes that involve multiple non Kohler products, that have not solved the problem.So, as others have stated, just give up and get this product.I am a typical home owner and installed this myself.It took about 1 1/2 hours.. not the 25 minutes that someone noted a plumber took, but the install was rather basic. Anyone can do it.A few comments and highlights.1.) Draining the tank with a turkey baster after the flush took longer than expected. There is a fair amount of water that needs to be removed. That took about 15 minutes..but no water on the floor.2.) Try as i might , I could not get the flush valve piece to seat into the base of the toilet without leaking. After installing the new device, and tightening the three screws and clamps, it continued to leak. So, I took the old one, which was simply put in with a twist and three plastic tabs engaged and tightened. That one works with the new rubber seal.The attempts to make the new flush assembly seat without leaking took about 1/2 hour of frustration.3.) The hose for the rim water is, as other note, hard to install. I followed other suggestions.a.) trim the end with a knife or razor to make the thickness of the tube thinner. I use a scissor to to bevel the end even narrower.b.) The input plastic attachment is not in the same place as the original And, the hose does not want to connect without a struggle. I followed the advice of another poster. I put the tube in a pot of boiling water, waited one minute, and then the tube flexed easily and fit in. As it cooled, it held the position.c.) When installing the hose, loosen the float valve assembly from the tank, it makes it easier to plug in the hose and the tighten the float valve.4.) I used lime away to remove the 25 years of lime build up under the assembly.5.) Those gaskets after 25 years are disgusting. Bring some paper towels to wipe your hands.6.) I used the original water attachment with the new assembly. I didn't need a new hose. The original copper tube that was in place worked fine.All in all, after a struggle with the flush valve assembly and the rim hose, it works fine. No leaks, no running, a perfect flush.. like new.Only four stars because:The rim hose should be shaped and easier to install.The flush valve is harder to install with the silly three screws and grommets than the original which is simply push and turn.And,the rim tube attachment to the float valve is not in the same place.so, four stars for IT WORKS.But, it could be better
Trustpilot
3 days ago
2 months ago